
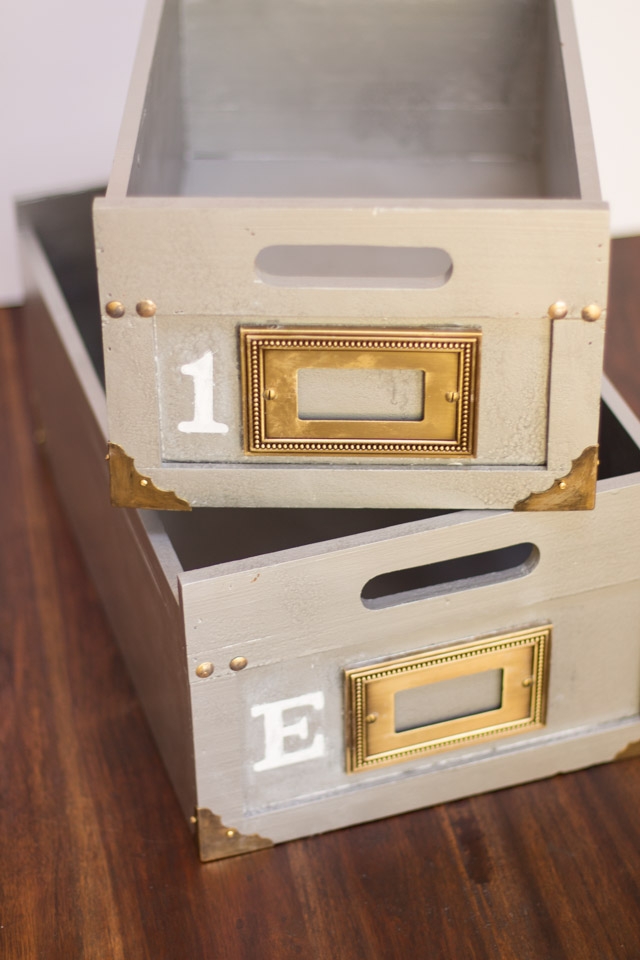
You can make a set of distressed, stencilled vintage storage boxes that look like Anthropologie-quality pieces for a fraction of the cost, using unfinished wooden boxes from Amazon UK and a single tin of Rustoleum Hammered Silver spray paint from B&Q. The whole project takes an afternoon, dries overnight, and the result is storage that works as hard as it looks good.
The original inspiration is a set of French Suroy storage boxes that an Anthropologie buyer spotted at a Parisian flea market. Beautiful, genuinely. But the red didn’t work with anything in our house, and I wasn’t paying boutique prices for a box. So I worked out how to make my own version, and I’ve since made three sets of these across different rooms.
This tutorial has been updated in 2026 with current UK sourcing, because most tutorials for this project reference Home Depot, which isn’t helpful when you’re in South East London. Everything you need is either on Amazon UK or at B&Q.
What you need for DIY vintage storage boxes
The supplies list is short, which is one of the things I like about this project. You’re not buying a trolley full of craft materials you’ll use once and forget about.
- Unfinished wooden boxes, available on Amazon UK (search “unfinished wood storage boxes” – they come in packs and various sizes)
- Rustoleum Hammered Silver spray paint, from B&Q
- Metal corner accents, available on Amazon UK (search “decorative metal box corners”)
- Single gang blanking plates or decorator faceplates, from B&Q or Screwfix (these become your label holders)
- Longer screws than the ones supplied with the faceplates
- Decorative thumbtacks or upholstery tacks
- A stencil: letters, numbers, or French script all work well
- A white paint pen, or white craft paint and a small brush
- A drill
The switch faceplate trick is the bit that makes these look expensive. Standard single gang blanking plates are the flat covers used over unused electrical sockets or switches, and they’re sold at B&Q and Screwfix for very little. Screw one onto the front of a wooden box and it creates a perfect little window for a printed label to sit underneath. It looks like intentional design rather than a repurposed electrical fitting, which is the whole point.
Before you start
Sand the outside of your boxes lightly before you spray anything. A quick pass with medium-grit sandpaper is enough to help the paint grip the wood. Skip it and you’ll get peeling within a few months, especially on boxes that get handled regularly. I skipped it the first time. Don’t be me.
Work outside or with windows fully open. Rustoleum Hammered spray paint has a strong smell and needs proper ventilation. Our back garden in South East London is not exactly sprawling, but it’s big enough to lay a dust sheet down and get the job done on a dry day. Avoid spraying in direct sunlight if it’s warm, as it can cause the surface to bubble before the texture develops properly.

My boxes weren’t bad before…they just needed a little shiny hardware and a stencil. These are the perfect size to organise books and craft supplies.
How to make them, step by step
This goes faster than you’d expect. The waiting-for-things-to-dry time is longer than the actual doing time, so it’s a good project to start on a Saturday morning and come back to in the afternoon.
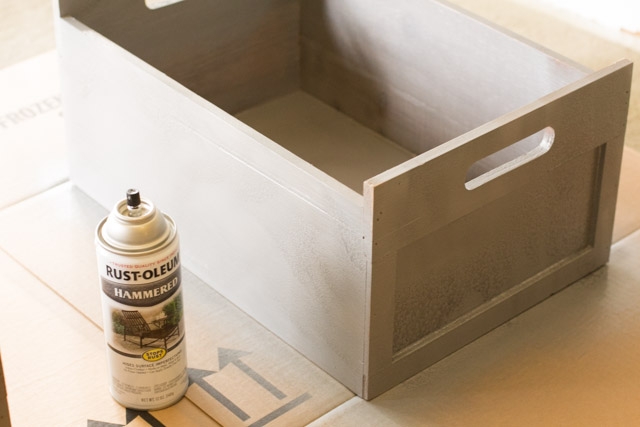
Spray paint the boxes. Set them on a dust sheet and apply two coats of the Rustoleum Hammered Silver. This formula is forgiving in a way standard spray paint isn’t: thick coats, the odd drip, and slightly uneven coverage all add to the vintage effect rather than ruining it. I did two generous and fairly sloppy coats and the result was better for it. The hammered texture doesn’t appear immediately, it develops as the paint dries, which is genuinely satisfying to watch happen.
Let the first coat become touch-dry (around 20 to 30 minutes) before applying the second. Leave the boxes to cure fully overnight before attaching anything to them.
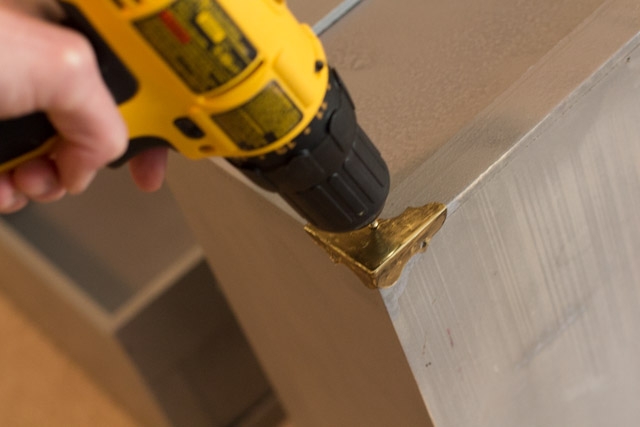
Attach the metal corner accents. Once the paint is cured, drill the corner accents onto the box. Flat plate-style accents sit closer to the surface and look more authentic than the three-dimensional styles. Go slowly with the drill and use a bit slightly smaller than your screws so the wood doesn’t split at the corners.
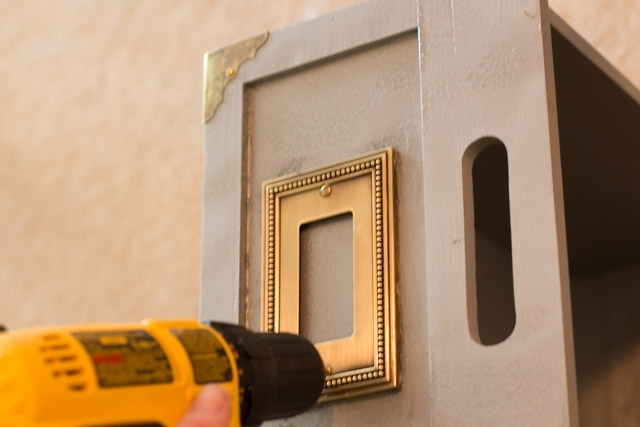
Fit the switch faceplate. You can’t use the screws that come with the blanking plate because it isn’t sitting flush against a wall box as it would normally. You need slightly longer screws, but not so long that they come through to the inside of the box. Measure the depth of your box front before buying screws. Once the plate is on, you can slide a printed label underneath it. I use plain card with the contents typed out. It looks neat, it’s easy to update if the contents change, and nothing sticks to anything.
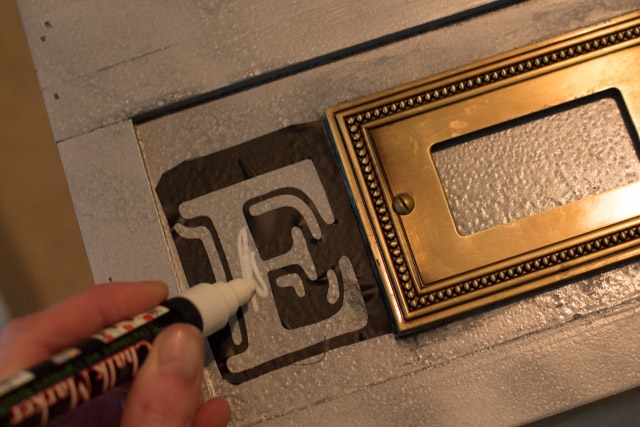
Add the decorative details. Press a few decorative thumbtacks around the faceplate or along the top edge of the box. Then use your stencil and white paint pen to add a letter or number. Single letters work well for category labels. Numbers are more useful if you’re running a proper storage system and want to cross-reference a contents list elsewhere.
A paint pen is the easiest tool for stencilling this. It gives you control and you don’t need to worry about the stencil shifting while you load a brush. One thin coat is usually enough, and if it looks slightly translucent that actually adds to the vintage look rather than detracting from it.
Insert the printed labels. Print on plain card or paper, cut to size, and slide under the faceplate. Done. The label sits cleanly behind the plate and is simple to swap out whenever you need to.

I couldn’t be happier with the result of these DIY vintage storage boxes! I think I even like mine better than the original. I can’t wait to show these babies off in our office at the new house!

Why these are actually useful and not just pretty
A lot of decorative DIY box projects are exactly that: decorative. These are functional, which is why I keep making them. The combination of the stencilled identifier and the swappable label means you can use them for almost anything without the boxes becoming mystery containers that never get opened.
I have a set in our home office for things that need to be accessible but not on display: charging cables, instruction manuals, stationery, the art supplies that have migrated from the kitchen because three children generate a significant quantity of felt tips and glitter glue. The silver finish means they sit on a shelf without looking like storage. Visitors assume I bought them somewhere considered.
The boxes work equally well in a bedroom, on open shelving in a living room, or in a kitchen if you have the shelf space. The size of wooden box you start with determines the use, so it’s worth thinking about what you actually need to store before buying. The ones I’ve found most useful are around 30cm long: big enough for A4 folders or a stack of paperbacks, small enough to sit on a standard Ikea shelf without dominating it.
For younger children who want to get involved: mine have helped with the stencilling, the thumbtacks, and the label-making. The spray painting needs adult handling and proper ventilation, and the drilling is adults only. But everything else is genuinely doable with a craft-minded eight or nine-year-old and makes them feel like they’ve made something serious.
Variations if the silver finish isn’t quite right for your room
The Rustoleum Hammered range comes in other finishes including bronze and black. Bronze gives a warmer, more antique effect that reads as slightly more French flea market than industrial. Black with gold corner accents is quite different in feel: more Victorian apothecary than Parisian vintage, which suits some rooms better.
If you want a more weathered look, dry-brush a very small amount of brown or ochre craft paint over the silver once it’s fully cured, focusing on the edges. Use an almost-dry brush. This gives the impression of rust or patina that normally takes years. The third set I made used this technique in bronze and it’s the one that gets the most comments from visitors.
For a completely different colour direction, chalk paint in dark navy or forest green as the base works well with silver hardware on top. That reads as more contemporary than vintage, so it depends on what you’re going for.
Frequently asked questions about DIY vintage storage boxes
Where can I buy unfinished wooden boxes in the UK?
Amazon UK is the most reliable source and has the widest range of sizes. Search for “unfinished wooden storage boxes” or “plain wood craft boxes.” Hobbycraft stocks them in smaller sizes, better for jewellery or small craft storage. The Range carries them intermittently. If you want something larger, the Ikea Moppe mini chest of drawers is a different take on the same project and worth considering as an alternative.
Is Rustoleum Hammered Silver available in UK shops?
Yes. B&Q stocks it in the spray paint section, both in store and online. Wilko sometimes carries it too. It’s also on Amazon UK if you’d rather order it. The one to look for is Rustoleum Universal Hammered Effect in Silver, and the link in the supplies list goes directly to it at B&Q.
What can I use instead of a switch faceplate as a label holder?
Metal label holders designed for furniture are available on Amazon UK if you’d rather not use electrical faceplates. Search “metal label holder furniture” and you’ll find several styles that screw directly onto wood and are designed exactly for this purpose. They don’t give quite the same look as the switch plate version but they’re simpler to fit. If you want to avoid drilling entirely, a small luggage tag attached to a thumbtack works as a more casual alternative.
How long does the spray paint take to dry between steps?
Rustoleum Hammered Silver is touch-dry in around 20 to 30 minutes in normal conditions and ready for a second coat after an hour. Full cure takes 24 hours, and it’s worth waiting the full time before drilling or attaching hardware. In colder or damp weather, which is most of our crafting weather in the UK, dry times will be longer. If you’re working in winter, plan for it to take longer and don’t rush the cure step or the hardware won’t sit properly.
Can children help with this project?
Most of it. The spray painting needs adult handling and good ventilation. The drilling is adults only. But the stencilling, thumbtack placement, label-making, and final assembly are all things a craft-focused eight or nine-year-old can manage independently. The finished boxes make a good personalised gift project for older children who want to make something that looks genuinely impressive rather than obviously homemade.
I’ve made three sets of these over the years and I’d make more. The first set lives in our home office. The second went to my mum. The third, done in bronze with the dry-brushed patina finish, sits in our bedroom and gets more comments than almost anything else in the room. The project takes an afternoon, the materials are genuinely affordable, and the result looks like something you’d find at an interiors boutique. That combination is rarer than it should be in DIY.
See more craft posts here!

Becky is the voice behind Life in Velvet, an organised, intentional living blog focused on practical food, calm homes, thoughtful projects, and everyday systems that make real life feel easier. A mum of 3 living in the UK, Becky writes from lived experience, sharing what works, what doesn’t, and the decisions that make family life run more smoothly.
With a background in marketing and content writing, and over a decade of blogging experience, she brings a thoughtful, structured approach to everything from baking and home projects to routines and decision-making. Life in Velvet is where planning meets creativity, with ideas designed for real homes and real life.