
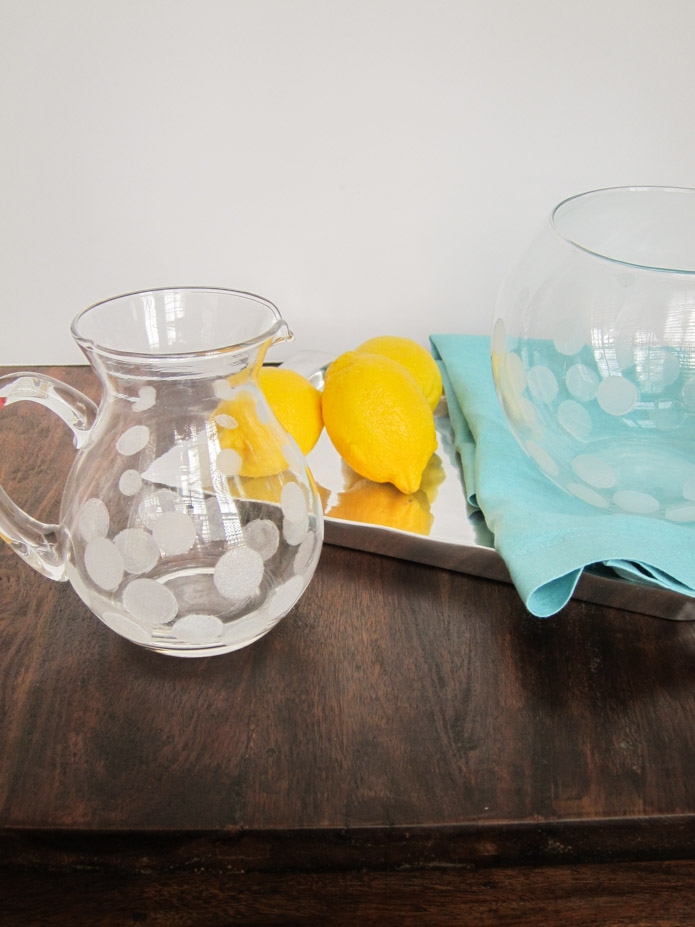
How to Make a Frosted Dot Glass Jug
Looking for a creative way to upcycle a plain glass jug or carafe? A frosted dot glass jug adds a beautiful, modern touch to any kitchen or table setting—and it’s surprisingly simple to make at home. Whether you’re going for a subtle, Scandi-inspired aesthetic or a playful polka-dot look, this DIY is both fun and functional.
What You’ll Need:
-
A clean, dry glass jug or carafe
-
Frosted glass spray (e.g. this Frosted Glass Spray)
-
Round sticker dots (removable, e.g. from a stationery or craft store)
-
Masking tape or painter’s tape
-
Newspaper or a drop cloth
-
A well-ventilated area (preferably outdoors or in a garage)
-
Gloves and a mask (for safety when using spray paint)
Step-by-Step Instructions
Step 1: Clean Your Glass Jug
Start by washing your jug with warm soapy water and drying it thoroughly. Any dust, grease, or fingerprints can affect how the frosted spray adheres to the glass.
Step 2: Apply Dot Stickers
Stick your round stickers directly onto the jug wherever you want clear dot designs to appear. You can space them evenly for a neat, modern look or arrange them randomly for something more playful.
Tip: Use different-sized dots for a more organic or whimsical pattern.
Step 3: Protect Areas You Don’t Want Frosted
If you only want the jug frosted partway (e.g. not the handle or top edge), use painter’s tape to mask off those areas. Cover the inside of the jug opening with tape or paper to avoid spray getting in.
Step 4: Set Up Your Spray Station
Place your jug on newspaper or a drop cloth in a well-ventilated area. Make sure it’s stable and upright.
Put on gloves and a mask to protect yourself from fumes and overspray.
Step 5: Apply the Frosted Glass Spray
Shake the frosted glass spray can well, then spray a light, even coat over the entire jug. Hold the can around 8–12 inches away from the surface. Apply 2–3 thin coats for best coverage, allowing each coat to dry for about 10–15 minutes.
Avoid spraying too heavily—drips or uneven texture can occur.
Step 6: Let It Dry and Cure
After your final coat, let the jug dry completely. Most sprays are dry to the touch within 30 minutes but may need 24 hours to fully cure and harden.
Step 7: Remove the Stickers
Once everything is dry, carefully peel off the dot stickers to reveal the clear glass underneath. If any edges need tidying up, you can gently scratch away mistakes with a craft blade or use a cotton bud dipped in nail polish remover.
Optional Finish:
Want a glossy finish inside the dots? Carefully apply clear nail polish or a glossy sealant to the inside of each dot for a glassy pop effect.
FAQs
Q: Can I wash the frosted jug?
A: Yes—but only by hand. Avoid dishwashers and harsh scrubbing, as it may damage the frosted surface. Use gentle soap and a soft sponge.
Q: Is the frosted spray food-safe?
A: No. Keep the frosted coating on the outside only, and avoid coating the rim or interior of the jug.
Q: Can I reuse the stickers for another project?
A: Probably not. Most stickers lose their stickiness after one use, especially if they’ve been sprayed over. But they’re inexpensive to replace.
Q: Will the frosted effect last?
A: Yes, with gentle care. If the jug is used primarily for decorative purposes or occasional serving, the effect can last for years.
Q: Can I use etching cream instead of spray?
A: Yes! Etching cream creates a permanent frosted effect, though it takes a bit more time and care. Always follow the product’s safety instructions.
Making a frosted dot glass jug is an easy DIY project that brings a touch of personality and elegance to your home. Whether it becomes a stylish water jug, a vase, or a decorative piece, you’ll love the custom look—and the satisfaction of creating it yourself.
See some more of my craft projects here

Becky is the voice behind Life in Velvet, an organised, intentional living blog focused on practical food, calm homes, thoughtful projects, and everyday systems that make real life feel easier. A mum of 3 living in the UK, Becky writes from lived experience, sharing what works, what doesn’t, and the decisions that make family life run more smoothly.
With a background in marketing and content writing, and over a decade of blogging experience, she brings a thoughtful, structured approach to everything from baking and home projects to routines and decision-making. Life in Velvet is where planning meets creativity, with ideas designed for real homes and real life.